Why Your First Dockerfile Doesn’t Have to Be Scary
Picture this: You’ve heard Docker can solve your “it works on my machine” problem. You’re excited. You create a file called Dockerfile, write three lines of code, and… nothing works. Sound familiar?
You’re not alone. Every developer has been there staring at cryptic error messages, wondering why their perfectly good application won’t containerize. The good news? Writing Dockerfiles isn’t rocket science. It’s more like following a recipe, and I’m about to give you one that actually works.
What’s a Dockerfile, Anyway? (The Non-Technical Explanation)
Think of a Dockerfile as a blueprint for your application’s environment. Just like a recipe tells you exactly what ingredients and steps you need to bake a cake, a Dockerfile tells Docker exactly what your application needs to run the operating system, dependencies, files, and commands.
For the technical folks: A Dockerfile is a text document containing instructions that Docker uses to build an image layer by layer. Each instruction creates a new layer in your image.

graph LR
    A[Dockerfile] -->|docker build| B[Docker Image]
    B -->|docker run| C[Docker Container]
    C -->|Your App Runs Here| D[🚀 Production]

    style A fill:#e1f5ff
    style B fill:#fff4e1
    style C fill:#e8f5e9
    style D fill:#fce4ec
Lexical error on line 4. Unrecognized text. ...ur App Runs Here| D[🚀 Production] -----------------------^
The Anatomy of a Dockerfile: Understanding the Building Blocks
Every Dockerfile follows a predictable structure. Let’s visualize how Docker processes your instructions:
sequenceDiagram
    participant Dev as Developer
    participant DF as Dockerfile
    participant Docker as Docker Engine
    participant Image as Docker Image

    Dev->>DF: Write instructions
    Dev->>Docker: docker build
    Docker->>DF: Read line by line
    DF->>Docker: Execute FROM
    DF->>Docker: Execute RUN
    DF->>Docker: Execute COPY
    DF->>Docker: Execute CMD
    Docker->>Image: Create layered image
Image-->>Dev: ✅ Build complete!Your First Dockerfile: A Real-World Example
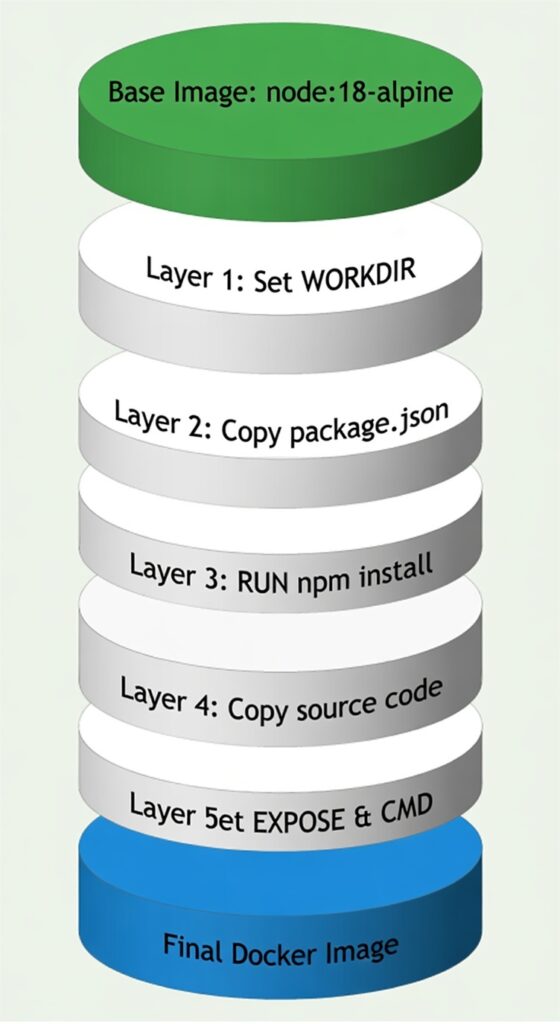
Let’s create a Dockerfile for a simple Node.js application. I’ll explain each line so even your non-technical teammate understands what’s happening.
# Start with a pre-built Node.js environment
FROM node:18-alpine

# Set the working directory inside the container
WORKDIR /usr/src/app

# Copy package files first (this is a performance trick!)
COPY package*.json ./

# Install application dependencies
RUN npm install --production

# Copy the rest of your application code
COPY . .

# Tell Docker which port your app uses
EXPOSE 3000

# Define the command to start your application
CMD ["node", "server.js"]
Why This Order Matters: Docker caches each instruction as a layer. By copying package.json before your code, Docker only reinstalls dependencies when they actually change not every time you modify a line of code. This saves minutes on every build!
The Complete Build Process: Architecture View
Common Mistakes and How to Dodge Them
Mistake #1: Copying Everything First
# ❌ Don't do this
COPY . .
RUN npm install
The Fix: Copy dependency files first, then install, then copy code.
Mistake #2: Running as Root
# ❌ Security risk
FROM node:18
# runs as root by default
The Fix: Create and switch to a non-root user.
# ✅ Much better
FROM node:18-alpine
RUN addgroup -g 1001 appgroup && \
    adduser -D -u 1001 -G appgroup appuser
USER appuser
Mistake #3: Forgetting .dockerignore
Create a .dockerignore file to exclude unnecessary files:
node_modules
npm-debug.log
.git
.env
*.md
.DS_Store
Python Alternative: Because Not Everyone Speaks JavaScript
Here’s a production-ready Python Dockerfile:
FROM python:3.11-slim

WORKDIR /app

# Install system dependencies if needed
RUN apt-get update && apt-get install -y \
    gcc \
    && rm -rf /var/lib/apt/lists/*

# Copy requirements first for better caching
COPY requirements.txt .
RUN pip install --no-cache-dir -r requirements.txt

# Copy application code
COPY . .

# Create non-root user
RUN useradd -m -u 1000 appuser && chown -R appuser:appuser /app
USER appuser

EXPOSE 8000

CMD ["python", "app.py"]
Multi-Stage Builds: The Pro Move
Want to keep your images small? Use multi-stage builds:
# Build stage
FROM node:18 AS builder
WORKDIR /app
COPY package*.json ./
RUN npm install
COPY . .
RUN npm run build

# Production stage
FROM node:18-alpine
WORKDIR /app
COPY --from=builder /app/dist ./dist
COPY package*.json ./
RUN npm install --production
CMD ["node", "dist/server.js"]
The Magic: Your final image only contains the production build with no development dependencies, no source code, just the compiled application.
Testing Your Dockerfile: The Moment of Truth
# Build your image
docker build -t my-first-app:1.0 .

# Run it locally
docker run -p 3000:3000 my-first-app:1.0

# Check if it's working
curl http://localhost:3000
Configuration for health checks:
# docker-compose.yml
version: '3.8'
services:
  app:
    build: .
    ports:
      - "3000:3000"
    healthcheck:
      test: ["CMD", "curl", "-f", "http://localhost:3000/health"]
      interval: 30s
      timeout: 10s
      retries: 3
Quick Reference: Dockerfile Instructions Cheat Sheet
| Instruction | Purpose | Example |
|---|---|---|
FROM | Base image | FROM ubuntu:22.04 |
WORKDIR | Set working directory | WORKDIR /app |
COPY | Copy files | COPY . . |
RUN | Execute commands | RUN apt-get update |
EXPOSE | Document ports | EXPOSE 8080 |
CMD | Default command | CMD ["npm", "start"] |
ENV | Set environment variables | ENV NODE_ENV=production |
Your Next Steps
Congratulations! You’ve just learned to write Dockerfiles that actually work. Here’s what to do next:
- Practice: Containerize a side project
- Explore: Try multi-stage builds with your own applications
- Optimize: Use
docker scanto check for vulnerabilities - Share: Help others avoid the mistakes you just learned to dodge
- For a detailed reference on using the dockerfile, please refer the DockerDocs