From Zero to Docker Extension
A visual, code‑first guide
1. Big picture: What is a Docker extension?
flowchart LR
    A[Docker Desktop] --- B[Extensions Tab]
    B --- C[Your Extension]
    C --> D[Frontend UI]
    C --> E[Backend services containers]
    C --> F[Executables on host]

    subgraph Image on Docker Hub
      C
      G[metadata.json]
      H[Dockerfile]
      I[UI files]
end- Runs inside Docker Desktop UI
- Shipped as a Docker image with:
metadata.jsonat root- Optional UI, backend, executables[Architecture]
2. Two main paths
graph TD
  A[Create Extension] --> B[Quickstart React+Go]
  A --> C[Minimal Frontend HTML only]

  B --> D[docker extension init]
  B --> E[React UI + Go backend]
  B --> F[Good for real apps]

  C --> G[Manual folder + files]
  C --> H[HTML UI only]
  C --> I[Good for learning]
We’ll focus on the minimal HTML extension (simplest), then show where the advanced React path fits.[Minimal frontend; Frontend tutorial]
3. Minimal HTML extension: folder layout
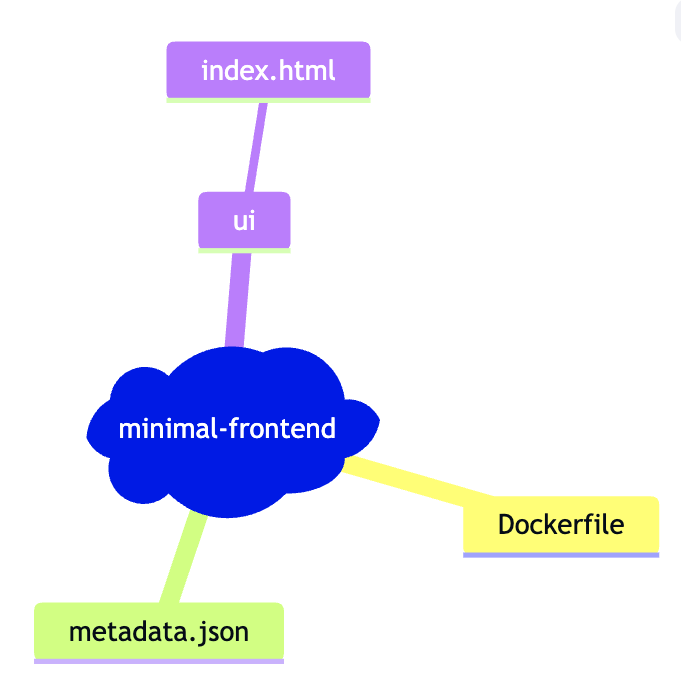
mindmap
  root(minimal-frontend))
    Dockerfile
    metadata.json
    ui
      index.html
Parse error on line 1: mindmap root(minim ^ Expecting 'NEWLINE', 'SPACE', 'GRAPH', got 'ALPHA'
mindmap
  root
    Dockerfile
    metadata.json
    ui
      index.html
Parse error on line 1: mindmap root D ^ Expecting 'NEWLINE', 'SPACE', 'GRAPH', got 'ALPHA'
This is the exact structure from the minimal sample.[Minimal frontend]
4. Step 1 – Create Dockerfile
Goal: Package UI + metadata into an extension image.
# syntax=docker/dockerfile:1
FROM scratch

LABEL org.opencontainers.image.title="Minimal frontend" \
    org.opencontainers.image.description="A sample extension to show how easy it's to get started with Desktop Extensions." \
    org.opencontainers.image.vendor="Awesome Inc." \
    com.docker.desktop.extension.api.version="0.3.3" \
    com.docker.desktop.extension.icon="https://www.docker.com/wp-content/uploads/2022/03/Moby-logo.png"

COPY ui ./ui
COPY metadata.json .
What matters:
FROM scratch– tiny image- Labels:
org.opencontainers.image.*– title, description, vendorcom.docker.desktop.extension.api.version– SDK API versioncom.docker.desktop.extension.icon– icon URL for Marketplace card[Minimal frontend; Distribution]
COPY ui ./ui– ship your UICOPY metadata.json .– required at image root[Extensions SDK overview]
5. Step 2 – Create metadata.json
Goal: Tell Docker Desktop how to load your UI.
{
  "ui": {
    "dashboard-tab": {
      "title": "Minimal frontend",
      "root": "/ui",
      "src": "index.html"
    }
  }
}
Key ideas:
"ui"section defines the Dashboard tab[Architecture; Minimal frontend]"root": "/ui"→ matchesCOPY ui ./ui"src": "index.html"→ entry HTML file
6. Step 3 – Create ui/index.html
Goal: Simple HTML UI that appears as a new tab in Docker Desktop.
<!DOCTYPE html>
<html lang="en">
  <head>
    <meta charset="UTF-8" />
    <title>Minimal frontend</title>
  </head>
  <body>
    <h1>Minimal Docker Extension</h1>
    <p>This is a plain HTML UI running inside Docker Desktop.</p>
  </body>
</html>
- Keep it simple for the first run.
- Later you can add JS, CSS, and follow the design guidelines to match Docker Desktop.[Design guidelines; UI styling]
7. Step 4 – Build & install
sequenceDiagram
    participant Dev as You
    participant CLI as Docker CLI
    participant DD as Docker Desktop

    Dev->>CLI: docker build -t awesome-inc/my-extension:latest .
    CLI->>CLI: Build image with Dockerfile + metadata.json + ui/
    Dev->>CLI: docker extension install awesome-inc/my-extension:latest
    CLI->>DD: Register extension
DD->>Dev: New tab under "Extensions"Commands (run in project root):
docker build --tag=awesome-inc/my-extension:latest .

docker extension install awesome-inc/my-extension:latest
Then:
- Restart / reopen Docker Desktop
- Look under Extensions → your new tab appears[Minimal frontend; Quickstart]
To remove:
docker extension rm awesome-inc/my-extension:latest
8. Advanced path – React + Extensions SDK
Once interns are comfortable with the minimal HTML extension, move them to the advanced React-based extension.
8.1 Generate boilerplate
docker extension init my-extension
cd my-extension
docker build -t <hub-namespace>/my-extension .
docker extension install <hub-namespace>/my-extension
This creates:
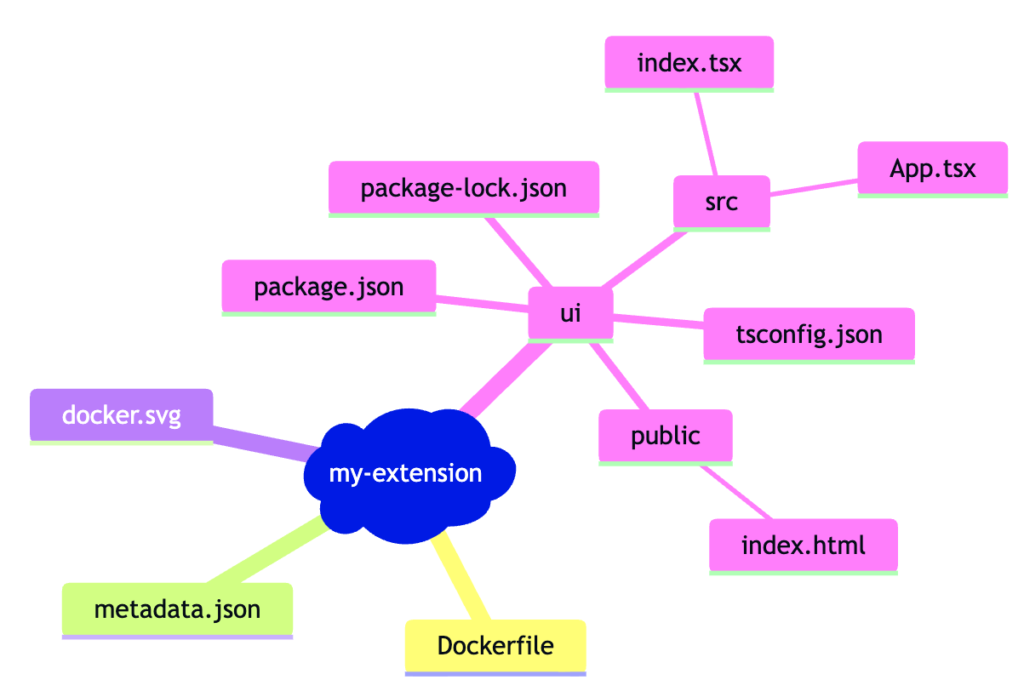
mindmap
  root(my-extension)
    Dockerfile
    metadata.json
    docker.svg
    ui
      public
        index.html
      src
        App.tsx
        index.tsx
      package.json
      package-lock.json
      tsconfig.json
Parse error on line 1: mindmap root(my-ex ^ Expecting 'NEWLINE', 'SPACE', 'GRAPH', got 'ALPHA'
- React UI in
ui/ - Dockerfile already wired for React build[Frontend tutorial; Quickstart]
8.2 Dockerfile for React UI
Typical pattern (from docs):
# syntax=docker/dockerfile:1
FROM --platform=$BUILDPLATFORM node:18.9-alpine3.15 AS client-builder
WORKDIR /ui

# cache packages in layer
COPY ui/package.json /ui/package.json
COPY ui/package-lock.json /ui/package-lock.json
RUN --mount=type=cache,target=/usr/src/app/.npm \
    npm set cache /usr/src/app/.npm && \
    npm ci

# install
COPY ui /ui
RUN npm run build

FROM alpine
LABEL org.opencontainers.image.title="My extension" \
    org.opencontainers.image.description="Your Desktop Extension Description" \
    org.opencontainers.image.vendor="Awesome Inc." \
    com.docker.desktop.extension.api.version="0.3.3" \
    com.docker.desktop.extension.icon="https://www.docker.com/wp-content/uploads/2022/03/Moby-logo.png" \
    com.docker.extension.screenshots="" \
    com.docker.extension.detailed-description="" \
    com.docker.extension.publisher-url="" \
    com.docker.extension.additional-urls="" \
    com.docker.extension.changelog=""

COPY metadata.json .
COPY docker.svg .
COPY --from=client-builder /ui/build ui
- First stage: build React app
- Second stage: ship built assets + metadata + icons[Adapting Dockerfile]
8.3 Use the Extensions API client
In ui/src/App.tsx:
// ui/src/App.tsx
import React, { useEffect } from 'react';
import {
  Paper,
  Stack,
  Table,
  TableBody,
  TableCell,
  TableContainer,
  TableHead,
  TableRow,
  Typography
} from "@mui/material";
import { createDockerDesktopClient } from "@docker/extension-api-client";

// obtain docker desktop extension client
const ddClient = createDockerDesktopClient();

export function App() {
  const [containers, setContainers] = React.useState<any[]>([]);

  useEffect(() => {
    // List all containers
    ddClient.docker.cli.exec('ps', ['--all', '--format', '"{{json .}}"']).then((result) => {
      // result.parseJsonLines() parses the output of the command into an array of objects
      setContainers(result.parseJsonLines());
    });
  }, []);

  return (
    <Stack>
      <Typography data-testid="heading" variant="h3" role="title">
        Container list
      </Typography>
      <Typography
        data-testid="subheading"
        variant="body1"
        color="text.secondary"
        sx={{ mt: 2 }}
      >
        Simple list of containers using Docker Extensions SDK.
      </Typography>
      <TableContainer sx={{ mt: 2 }}>
        <Table>
          <TableHead>
            <TableRow>
              <TableCell>Container id</TableCell>
              <TableCell>Image</TableCell>
              <TableCell>Command</TableCell>
              <TableCell>Created</TableCell>
              <TableCell>Status</TableCell>
            </TableRow>
          </TableHead>
          <TableBody>
            {containers.map((container) => (
              <TableRow
                key={container.ID}
                sx={{ '&:last-child td, &:last-child th': { border: 0 } }}
              >
                <TableCell>{container.ID}</TableCell>
                <TableCell>{container.Image}</TableCell>
                <TableCell>{container.Command}</TableCell>
                <TableCell>{container.CreatedAt}</TableCell>
                <TableCell>{container.Status}</TableCell>
              </TableRow>
            ))}
          </TableBody>
        </Table>
      </TableContainer>
    </Stack>
  );
}
createDockerDesktopClient()→ access Docker Desktop APIsddClient.docker.cli.exec('ps', ...)→ rundocker psand show containers in a table[Use API client]
Install the client library:
npm install @docker/extension-api-client
# optional for TypeScript types:
npm install @docker/extension-api-client-types --save-dev
9. Design & UX checklist for interns
checklist
    title Extension UX checklist
    item Use Docker MUI theme
    item Support light & dark mode
    item Clear header & navigation
    item No embedded terminals
    item Simple onboarding text
    item Screenshots & description for Marketplace
All of these are explicitly required/recommended in the design docs.[Design guidelines; UI styling]
10. Suggested learning steps
- Day 1:
- Build & install the minimal HTML extension.
- Day 2:
- Use
docker extension initand explore the generated React+Go project.
- Use
- Day 3+:
- Add real features using
@docker/extension-api-client. - Apply design guidelines and prepare for Marketplace-style packaging.[Build process; Quickstart]
- Add real features using
This sequence keeps the learning curve gentle while staying aligned with the official Docker Extensions SDK workflow.